From inside (document excerpt):
EZ-Flo Plus 1 ” (25 mm) Globe and Angle Valve Series Installation and Operating Instructions TM Specifications · Flow range: 0.25 30 GPM (1,0 114 LPM) · Operating pressure: 10 150 PSI (0,70 10 Bar) · Encapsulated Solenoid: 24 V a.c., 50/60 Hz (nominal) 19 V a.c., 50/60 Hz (minimum) Inrush: 0.40 amps, 9.6 VA @ 24 V a.c., 60 Hz 0.34 amps, 8.16 VA @ 24 V a.c., 50 Hz Holding: 0.20 amps, 4.8 VA @ 24 V a.c., 50/60 Hz Friction Loss: GPM Flow PSI Loss LPM Flow 1 19 38 Bar Loss 0,138 0,241 0,276 0,138 0,228 0,152 (Globe) (Angle) 57 76 114 0,207 0,228 0,427 (Globe) 0,124 0,131 0,269 (Angle) Valve Installation Guidelines · This valve series does not provide backflow prevention.
Lawn Mowing User Manual Free Download. Power Lawn Mower Free Instruction Manual Download PDF.
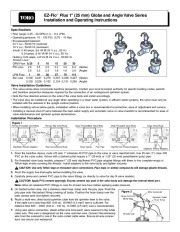
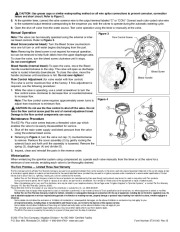
Contact your local municipal authority for specific building codes, permits and backflow prevention measures required for the connection of an underground sprinkler system. · Note the flow direction arrows on the side of the valve body and install accordingly. · The valve may be installed at any angle when operating in a clean water system. In effluent water systems, the valve must only be installed with the solenoid in the upright vertical position. · When installing valves below grade, installation within a valve box is recommended for protection, ease of adjustment and service. · Installing a manual shut-off valve between the main water supply and automatic valve or valve manifold is recommended for ease of valve maintenance and sprinkler system winterization. Installation Procedure Figure 1 Female Threaded Valve Body Valve Box Female Slip Valve Body Male Thread/Barb Valve Body Male Threaded Valve Body Angle Valve Body Slip/Male Thread Adapters Pipe Cemented to Body Hose Clamp Poly Pipe Slip/Female Thread Adapters Slip/Male Thread Adapters 1. From the backflow device, route (25 mm) 1 ” schedule 40 PVC pipe to the valve or valve manifold inlet. Use 25 mm (1 “) class 200 PVC on the valve outlet. Valves with a barbed outlet require a 1 ” (25 mm) or 1.25 ” (32 mm) polyethylene (poly) pipe. 2. For threaded valve body models, prepare 1 ” (25 mm) slip/thread PVC pipe adapter fittings with three to five complete wraps of Teflon® tape evenly covering the threads. Install adapters to the valve body and tighten securely. CAUTION: Use only Teflon tape on threaded valve connections. Pipe dope or similar compounds will damage plastic threads. 3. Flush the supply line thoroughly before installing the valve. 4. Carefully prime and cement PVC pipe to the valve fittings (or directly to valve for slip-fit valve models). CAUTION: Apply PVC cement sparingly. Excess cement can pool in the valve body and damage the internal bleed port. Note: Allow all cemented PVC fittings to cure for at least one hour before applying water pressure. 5. On barbed outlet valve, slip a stainless steel hose clamp onto the poly pipe. Push the poly pipe onto the barbed fitting covering all barbs. Position the hose clamp over the barb contact area and tighten securely. 6. Route a multi-wire, direct-burial sprinkler cable from the sprinkler timer to the valve. If the cable run is less than 800′ (244 m), 18 AWG (1.0 mm2) wire is sufficient. For distance from 800′ 2000′ (244 m 610 m), 14 AWG (2.5 mm2) wire is recommended. 7. Using wire splice connectors, attach either wire from each valve solenoid to the white cable wire. This wire is designated as the valve common wire. Connect the remaining wire from the solenoid to one of the color-coded cable wires. Ensure all wire connections are secure and waterproof. Figure 2 Valve Common White Wire Wire Connector Sprinkler Cable From Timer Grease Cap CAUTION: Use grease caps or similar waterproofing method on all wire splice connections to prevent corrosion, connection failure and short circuit. Refer to Figure 2. 8. At the sprinkler timer, connect the valve common wire to the output terminal labeled “C ” or “COM. ” Connect each color-coded valve wire to the numbered output terminal corresponding to the sequence you wish the valves to operate during the automatic watering cycle. 9. Open the shut-off valve from the water source. Test valve operation using the timer or manually at the valve. Manual Operation Note: The valve can be manually operated using the external or internal bleed controls. Refer to Figure 3. Bleed Screw (external bleed): Turn the Bleed Screw counterclockwise one full turn or until water begins discharging from the port. Note: Removing the bleed screw is not required for manual operation, but can be removed to help flush debris from the upper diaphragm area. To close the valve, turn the bleed screw clockwise until it stops. Do not over-tighten! Bleed Handle (internal bleed): To open the valve, move the Bleed Handle counterclockwise to the stop. The valve will open as discharge water is routed internally downstream. To close the valve, move the handle clockwise until resistance is felt. Do not over-tighten! Flow Control Adjustment (for valve model with flow control) The valve is set for maximum flow at the factory. If flow adjustment is required, use the following procedure: 1. While the valve is operating, use a small screwdriver to turn the flow control screw clockwise to decrease flow or counterclockwise to increase flow. Note: The flow control screw requires approximately seven turns to adjust from maximum to minimum flow. CAUTION: Do not use the flow control to shut off the valve. Do not force the flow control screw past the end of normal adjustment travel. Damage to the flow control components can occur.
Wikipedia’s page for Toro Company
Company Web Site: www.toro.com


 Toro EZFlo Plus Globe Angle Installation Catalog - 1 of 2
 Toro EZFlo Plus Globe Angle Installation Catalog - 2 of 2